


NodeMCU ESP8266 / ESP8285 Arduino #29 ESP8266 NodeMCU ติดต่อ Arduino แบบ I2C
8 ปีที่ผ่านมา
ESP8266 NodeMCU ติดต่อ Arduino แบบ I2C
ในตัวอย่างนี้เราจะใช้ ESP8266 NodeMCU ติดต่อ Arduino แบบ I2C ซึ่งมีข้อดีคือใช้สายไฟเพียง 2 เส้น และยังสามารถใช้สายไฟร่วมกับ I2C ตัวอื่นได้ ทำให้ประหยัดขาในการทดลอง การที่ ESP8266 สามารถคุยติดต่อกับ Arduio ได้ ทำให้เราสามารถสั่ง Arduino ให้ประมวลผลงานอื่นให้ เช่น ขยายขา I/O 
ต่อวงจร ESP8266-Arduino ดังนี้ Arduino - NodeMCU
- A5 - D1
- A4 - D2
- VIN - VIN
- GND - GND
โคดมี 2 ส่วนคือ Arduino และ ESP8266 โคดส่วน Arduino
#include
int LED = 13;
int x = 0;
void setup() {
pinMode(LED, OUTPUT);
Wire.begin(9);
Wire.onReceive(receiveEvent);
}
void receiveEvent(int bytes) {
x = Wire.read();
}
void loop() {
if (x == 1) {
digitalWrite(LED, 1);
} else if (x == 0) {
digitalWrite(LED, 0);
}
}
โคดส่วน NodeMCU สแกน Address ของ I2C
#include

void setup()
{
Wire.begin();

Serial.begin(9600);
while (!Serial); // Leonardo: wait for serial monitor
Serial.println("\nI2C Scanner");
}

void loop()
{
byte error, address;
int nDevices;

Serial.println("Scanning...");

nDevices = 0;
for(address = 1; address < 127; address++ )
{
// The i2c_scanner uses the return value of
// the Write.endTransmisstion to see if
// a device did acknowledge to the address.
Wire.beginTransmission(address);
error = Wire.endTransmission();

if (error == 0)
{
Serial.print("I2C device found at address 0x");
if (address<16)
Serial.print("0");
Serial.print(address,HEX);
Serial.println(" !");

nDevices++;
}
else if (error==4)
{
Serial.print("Unknow error at address 0x");
if (address<16)
Serial.print("0");
Serial.println(address,HEX);
}
}
if (nDevices == 0)
Serial.println("No I2C devices found\n");
else
Serial.println("done\n");

delay(5000); // wait 5 seconds for next scan
}
เมื่อเปิด Serial Monitor จาก NodeMCU จะพบว่าสามารถติดต่อ Arduino ที่เป็นแบบ I2C ได้ที่ Address 9
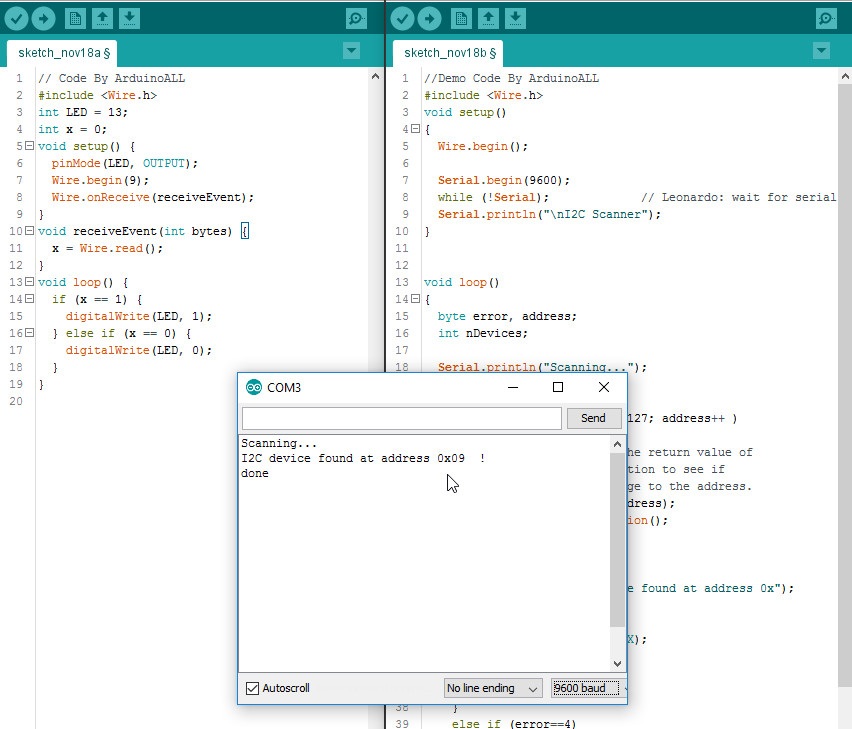
โคดส่วน ESP8266 ทดลองสั่งให้ Arduino เปิด/ปิดไฟ ขา 13
//Demo Code By ArduinoALL
#include
void setup()
{
Wire.begin();
}
void loop()
{
Wire.beginTransmission(9);
Wire.write(0);
Wire.endTransmission();
delay(1000);

Wire.beginTransmission(9);
Wire.write(1);
Wire.endTransmission();
delay(1000);
}
เมื่อทดลองก็จะเห็นไฟกระพริบ 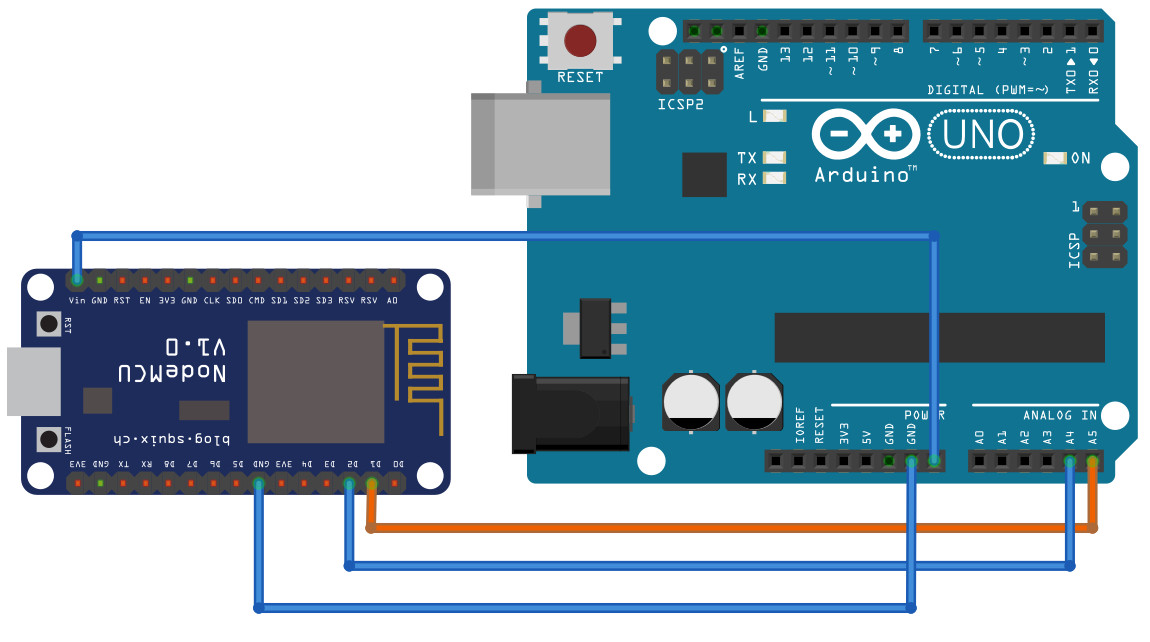 ตัวอย่างเพิ่มเติม https://www.arduino.cc/en/Tutorial/MasterWriter
 คลิปวีดีโอสอน Arduino ESP8266 NodeMCU ติดต่อ Arduino แบบ I2C

 ArduinoAll ขาย Arduino ซื้อ Arduino ทุกอย่าง เปลี่ยนชื่อเป็น AllNewStep
สมัครสมาชิกร้านนี้ เพื่อรับสิทธิพิเศษ
 ธ.กรุงไทย
ร้านค้าออนไลน์
Inspired by
LnwShop.com (v2)
สินค้าในตะกร้า ({{total_num}} รายการ)

ขออภัย ขณะนี้ยังไม่มีสินค้าในตะกร้า
ราคาสินค้าทั้งหมด
฿ {{price_format(total_price)}}
- ฿ {{price_format(discount.price)}}
ราคาสินค้าทั้งหมด
{{total_quantity}} ชิ้น
฿ {{price_format(after_product_price)}}
ราคาไม่รวมค่าจัดส่ง
รวมภาษีมูลค่าเพิ่มแล้ว
➜ เลือกซื้อสินค้าเพิ่ม