


NodeMCU ESP8266 / ESP8285 Arduino #49 ESP8266 NodeMCU Blynk App : สั่งงานและมอนิเตอร์ NodeMCU ผ่านโทรศัพท์มือถือด้วย Blynk
8 ปีที่ผ่านมา
ควบคุมและมอนิเตอร์ NodeMCU ESP8266 ผ่านโทรศัพท์มือถือด้วย Blynk
เราสามารถควบคุมสั่งงานและมอนิเตอร์ข้อมูลเซนเซอร์ต่าง ๆ บน ESP8266 ได้อย่างง่ายและรวดเร็ว ผ่านโทรศัพท์มือถือด้วย Blynk ซึ่งเราแทบจะไม่ต้องเขียนโคดกันเลย https://www.youtube.com/watch?v=lBTWt8mzM50&t=12 ในการทดลองนี้ เราจะสั่งงานเปิดปิด LED และอ่านค่าตัวต้านทานปรับค่าได้จาก ESP8266 NodeMCU ผ่านโทรศัพท์มือถือ ซึ่งสามารถควบคุมและติดตามได้ทุกที่ทั่วโลก 1.ดาวน์โหลดไลบารี Blynk จากที่นี่ 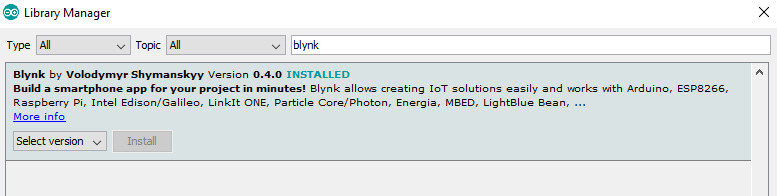 2. ดาวน์โหลด App Blynk ได้ที่ https://play.google.com/store/apps/details?id=cc.blynk 3. สร้างบัญชีและสร้างโปรเจกใหม่ จะได้ AUTH TOKEN เพื่อใช้ในการเขียนโปรแกรม NodeMCU
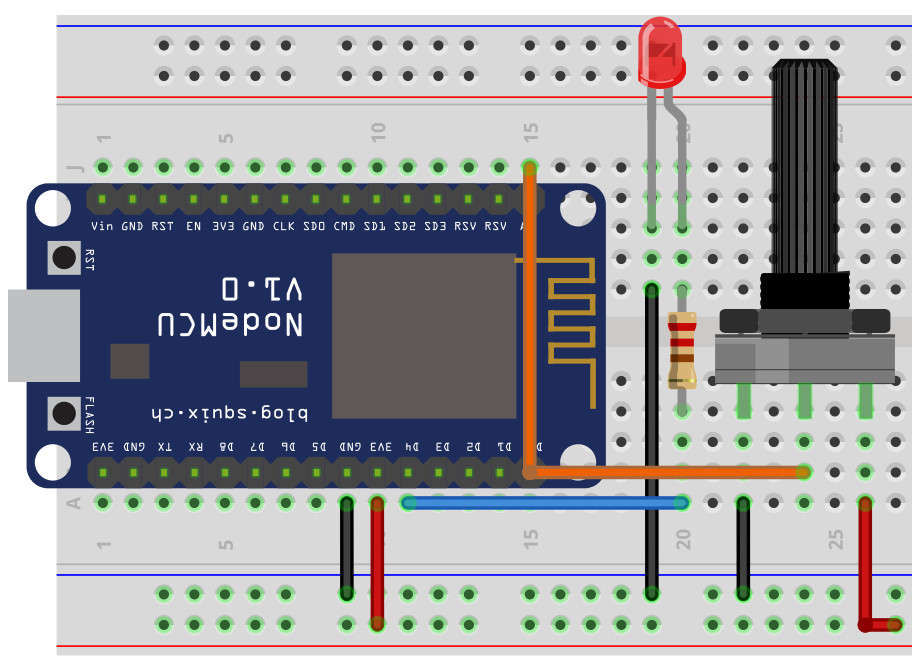
 4. ต่อ LED กับขา D4 แล้วเขียนโปรแกรมลง NodeMCU ดังนี้
#define BLYNK_PRINT Serial // Comment this out to disable prints and save space
#include
#include

// You should get Auth Token in the Blynk App.
// Go to the Project Settings (nut icon).
char auth[] = "a9d2e8623f69416e9f6370821ac7985";

void setup()
{
Serial.begin(115200);
Blynk.begin(auth, "wifi_ssid", "wifi_password");
}

void loop()
{
Blynk.run();
int value1 = 50;
int value2 = 45;
Blynk.virtualWrite(10,value1);
Blynk.virtualWrite(11,value2);
} การอ่านค่าจาก NodeMCU
ตัวอย่างนี้เป็นการอ่านค่า DHT แสดงบนโทรศัพท์มือถือ อัพโหลดโคดตามนี้
#define BLYNK_PRINT Serial // Comment this out to disable prints and save space
#include
#include
#include "DHT.h"

#define DHTPIN D2
#define DHTTYPE DHT11 // DHT 11
DHT dht(DHTPIN, DHTTYPE);

char auth[] = "a9d2e863f69416e9f6708261ac7985";

void setup()
{
Serial.begin(9600);
Blynk.begin(auth, "wifi_ssid", "gift4321");
Serial.println("DHTxx test!");
dht.begin();
}

void loop()
{
Blynk.run();

float h = dht.readHumidity(); // ความชื้น
float t = dht.readTemperature(); // อุณหภูมิ เซลเซียส

if (isnan(h) || isnan(t) || isnan(f)) {
Serial.println("Failed to read from DHT sensor!");
return;
}
Serial.print("Humidity: ");
Serial.print(h);
Serial.print(" %\t");
Serial.print("Temperature: ");
Serial.print(t);
Serial.print(" C ");
Serial.print(f);
Serial.println(" F\t");

Blynk.virtualWrite(10, t); //virtual pin
Blynk.virtualWrite(11, h); // virtual pin

delay(2000);
}
คลิปวีดีโอสอน Arduino ESP8266 NodeMCU Blynk App : สั่งงานและมอนิเตอร์ NodeMCU ผ่านโทรศัพท์มือถือด้วย Blynk

 ArduinoAll ขาย Arduino ซื้อ Arduino ทุกอย่าง เปลี่ยนชื่อเป็น AllNewStep
สมัครสมาชิกร้านนี้ เพื่อรับสิทธิพิเศษ
 ธ.กรุงไทย
ร้านค้าออนไลน์
Inspired by
LnwShop.com (v2)
สินค้าในตะกร้า ({{total_num}} รายการ)

ขออภัย ขณะนี้ยังไม่มีสินค้าในตะกร้า
ราคาสินค้าทั้งหมด
฿ {{price_format(total_price)}}
- ฿ {{price_format(discount.price)}}
ราคาสินค้าทั้งหมด
{{total_quantity}} ชิ้น
฿ {{price_format(after_product_price)}}
ราคาไม่รวมค่าจัดส่ง
รวมภาษีมูลค่าเพิ่มแล้ว
➜ เลือกซื้อสินค้าเพิ่ม